Showing posts with label spring boot. Show all posts

Tuesday, June 26, 2018

Saving data to file using SpringBoot postman

pom.xml:
<project xmlns="http://maven.apache.org/POM/4.0.0"
xmlns:xsi="http://www.w3.org/2001/XMLSchema-instance"
xsi:schemaLocation="http://maven.apache.org/POM/4.0.0 http://maven.apache.org/xsd/maven-4.0.0.xsd">
<modelVersion>4.0.0</modelVersion>

<groupId>com.boot</groupId>
<artifactId>raja-boot</artifactId>
<version>1.0.1-Release</version>
<packaging>war</packaging>

<name>spring-boot</name>
<url>http://maven.apache.org</url>

<properties>
<project.build.sourceEncoding>UTF-8</project.build.sourceEncoding>
<java.version>1.8</java.version>
</properties>

<parent>
<groupId>org.springframework.boot</groupId>
<artifactId>spring-boot-starter-parent</artifactId>
<version>1.5.1.RELEASE</version>
</parent>

<dependencies>

<dependency>
<groupId>org.springframework.boot</groupId>
<artifactId>spring-boot-starter-web</artifactId>
</dependency>
<dependency>
<groupId>org.springframework.boot</groupId>
<artifactId>spring-boot-starter-test</artifactId>
<scope>test</scope>
</dependency>
<!-- <dependency> -->
<!-- <groupId>org.springframework.boot</groupId> -->
<!-- <artifactId>spring-boot-starter-data-jpa</artifactId> -->
<!-- </dependency> -->

<!-- https://mvnrepository.com/artifact/org.springframework.boot/spring-boot-starter-json -->
<dependency>
<groupId>org.springframework.boot</groupId>
<artifactId>spring-boot-starter-json</artifactId>
<version>2.0.3.RELEASE</version>
</dependency>

</dependencies>
<build>
<plugins>
<!-- Package as an executable jar/war -->
<plugin>
<groupId>org.springframework.boot</groupId>
<artifactId>spring-boot-maven-plugin</artifactId>
</plugin>
</plugins>
</build>
</project>

2. SpringBootApp.java
import org.springframework.boot.SpringApplication;
import org.springframework.boot.autoconfigure.SpringBootApplication;

@SpringBootApplication(scanBasePackages={"com.boot"})
public class SpringBootApp {

public static void main(String[] args) {
SpringApplication.run(SpringBootApp.class, args);
System.out.println("spring boot application is running");
}
}

3. RestController.java
import java.io.BufferedWriter;
import java.io.File;
import java.io.FileOutputStream;
import java.io.IOException;
import java.io.OutputStreamWriter;

import org.springframework.web.bind.annotation.RequestBody;
import org.springframework.web.bind.annotation.RequestMapping;
import org.springframework.web.bind.annotation.RequestMethod;
import org.springframework.web.bind.annotation.ResponseBody;
import com.boot.entity.Student;

@org.springframework.web.bind.annotation.RestController
@RequestMapping("/api")
public class RestController {
@RequestMapping(value = "/ping/", method = RequestMethod.GET)
public String ping() {
  return "successsss !!";
}
@RequestMapping(value = "/create/", method = RequestMethod.POST)
@ResponseBody 
public String create(@RequestBody Student data) throws IOException {
File file = new File("/home/rajar/demo.txt");
FileOutputStream stream = new FileOutputStream(file);
OutputStreamWriter obj = new OutputStreamWriter(stream);
BufferedWriter br  =new BufferedWriter(obj);
br.write(data.getName().toString());
br.append("\n");
br.write(data.getId());
br.close();
  return "<h2>rajjjjjjaaaaaa !!</h2>";
}
}

4. Student.java

import java.io.Serializable;

public class Student implements Serializable {

private String id;
private String name;

public String getName() {
return name;
}

public void setName(String name) {
this.name = name;
}

public String getId() {
return id;
}

public void setId(String id) {
this.id = id;
}
}
Thursday, June 14, 2018

what is app name's PLACEHOLDER in spring boot properties file

In application.properties file use the following PLACEHOLDER

1.
app.name = any_name_you_want_for_your_app

2
How do you set description PLACEHOLDER in application.properties file
app.description = ${app.name} is a Spring Boot application 

3. How do you set the server context path in application.properties
server.context-path=/${app.name}

4. How do you set port in application.properties file?
server.port = 9091

5. How do you configure external file path in application.properties file?
prefix.jsonFileLocation = /home/ishaan/docs

Placeholder ref

Saturday, May 26, 2018

How do I run spring boot artifact (jar/war/ear)?

Problem statement: How do I run an artifact using cmd?

  • running an artifact as a package/zip application:

step-1: open cmd
step-2: go to the path where artifact is present in your machine
step-3: fire the following command
            $ java - jar myapp-1.0.0-SNAPSHOT
step-4: enter
step-5: now type the url to access through your browser

  • Using maven plugin:

step-1: open cmd
step-2: go to the path where artifact is present in your machine
step-3: fire the following command
            $ mvn spring-boot:run
step-4: enter
step-5: now type the url to access through your browser

Friday, May 11, 2018

Why do we need Actuator in Spring Boot?

Problem statement: what is actuator in spring boot?
Actuator provides production ready features of spring boot project that helps to monitor and manage application by invoking different HTTP endpoints exposed by spring boot actuator. such as application 
  1. health (active/inactive)
  2. version details (version of branch, date & time of deployment)
  3. logger details
  4. configurations
  5. bean details
  • How do you enable spring boot actuator?
  1. Need to include maven dependency in existing pom.xml file 
  2. spring-boot-starter-actuator
         <dependency>
               <groupId>org.springframework.boot</groupId>
               <artifactId>spring-boot-starter-actuator</artifactId>
         </dependency>
  • What do you mean by endpoints ?
  1. Endpoints allow you to monitor & interact with the application.
  2. Spring boot provides a number of built-in endpoints and it lets you add your own / custom endpoints.
  3. for example health endpoint provides basic application health information
  4. each individual endpoints can be enabled or disabled by using id, enabled, sensitive property in application.properties file. 
  • What are the default endpoints in Spring Boot?
  1. healthdisplays application health information.
  2. beans - displays a list of all spring beans in your application.
  3. info - displays arbitrary application info.
  4. loggers displays & modifies the configuration of loggers in the application.
  5. threaddump Performs a thread dump.
  6. httptrace - displays HTTP trace information (by default, the last 100 HTTP request-response exchanges).
  7. sessions - Allows retrieval and deletion of user sessions from a Spring Session-backed session store. Not available when using Spring Session’s support for reactive web applications.
  8. shutdown Lets the application be gracefully shutdown.
  9. metrics - displays metrics information of application.
  • If your application is a web application (Spring MVC, Spring WebFlux, or Jersey), you can use the following additional endpoints:
  1. heapdump - Returns a GZip compressed hprof heap dump file.
  • How do you enable endpoints in spring boot?
  1. By default, all endpoints except for shutdown are enabled
  2. to configure enablement of an endpoints, use its management.endpoint.<id>.enabled=true property in application.properties file
  • How do you enable shutdown endpoints ?
management.endpoint.shutdown.enabled=true
  • What are the default exposing endpoints to the WEB (external world)?
  1. health - yes
  2. info - yes
  3. beans - no
  4. loggers - no
  5. threaddump - no
  6. httptrace - no
  7. sessions - no
  8. shutdown  - no
  9. heapdump - no
  10. metrics - no
  • How do you change which endpoints to be exposed to Web or JMX?
  1. using  include and exclude properties
  • Default endpoints ID's exposure are:
  1. management.endpoints.web.exposure.include = health,info
  2. management.endpoints.jmx.exposure.include = *
  • How do you expose all the endpoints over HTTP / web?
  1. * can be used to select all endpoints properties.
  2. example - management.endpoints.web.exposure.include=*
  • How do you expose everything over HTTP / web / external world except  env and  beans  endpoints?
management.endpoints.web.exposure.include=*
management.endpoints.web.exposure.exclude=env,beans
  • How do you ConfigureCustomize existing endpoints in Spring Boot Actuator? 
  1. spring boot actuator allows customize endpoints by using spring properties. simply mention the name of the properties that you want to customize in your application.properties. 
  • How many ways endpoint can be configure / customize in Spring Boot Actuator?
      Three ways or three properties are available:
  1. id - accessed over HTTP
  2. enabled - if true then it can be accessed otherwise not
  3. sensitivity - if true then need the authorization to show crucial information over HTTP
Each endpoint can be customized with properties using the format:
endpoints.[endpoint name].[property to customize]

example:
1 - adding the below properties will customize the /beans endpoints:
     endpoints.beans.id=springbeans
     endpoints.beans.sensitive=false
     endpoints.beans.enabled=true
2 - adding the below properties will customize the /metrics endpoints:
     endpoints.metrics.id=springbeans
     endpoints.metrics.sensitive=false
     endpoints.metrics.enabled=true

Sunday, May 6, 2018

Why Microservices Architecture ?

Problem statement: What is microservices architecture?

Microservice architecture is a method of developing enterprise applications. Its architectural method is considered particularly ideal when you have to enable support for a range of platforms and devices—web, mobile, Internet of Things, and wearables—or simply when you’re not sure what kind of devices you’ll need to support in an increasingly cloudy future. 


1. Microservices is a method of developing software applications as a unit of independently deployable, small, modular services in which each service runs a unique process and communicates through a well defined, light weight mechanism to serve a business goal.

2. microservice gives developer the freedom to independently develop and deploy services.

3. microservices is a variant/type of Service Oriented Architecture (SOA) that structures an application as collection (group of individual service) of loosely coupled services.


4. Easy integration and automatic deployment (using open source continuous integration tools like Jenkins, Hudson)

5. When change is required in a certain part of the application, only the related service can be modified and redeployed — no need to modify and redeploy the entire application

6. Better fault isolation: If one microservice fails, the other will continue to work.

7. Easy to scale & integrate with third-party services.

8. Simple to understand & modify the service for developers, thus can help a new team member become productive quickly.

  • How the microservice communicates with each other ?
It uses HTTP / REST Webserives with JSON. REST(Representational State Transfer) is useful integration method
  • How Microservice Architecture Works?
  1. Object Oriented Programming (OOP)a modern programming paradigm (see also SOLID)
  2. Web service / APIa way to expose the functionality of your application to others, without a user interface
  3. Service Oriented Architecture (SOA)a way of structuring many related applications to work together, rather than trying to solve all problems in one application
  4. Systemsin the general sense, meaning any collection of parts that can work together for a wider purpose
  5. Single Responsibility Principle (SRP)the idea of code with one focus
  6. Interface Segregation Principle (ISP)the idea of code with defined boundaries.


Friday, May 4, 2018

Spring Boot Rest API Web Application !!

Problem statement: Implementation of Spring boot rest api web application

How to create Spring Boot Project for Rest API web service own implementation

Method-I: 
step-1: go to eclipse / sts ide menu bar
step-2: select File --> New --> Spring Starter Project
step-3: by default pom.xml will add required spring boot dependency
step-4: create your own controller class and enjoy.

Method-II:
step-1: go to eclipse / sts ide menu bar
step-2: select File --> New --> Maven Project
step-3: add the <spring-boot-starter-parent >
step-4: add <spring-boot-starter-web> dependency and enjoy


  • Required code implementations:

[1]- pom.xml:
<project xmlns="http...>

        <groupId>com.ishaan</groupId>
<artifactId>maven_projects</artifactId>
<version>0.0.1-SNAPSHOT</version>
<packaging>jar</packaging>
       
        <properties>
<project.build.sourceEncoding>UTF-8</project.build.sourceEncoding>
<java.version>1.8</java.version>
</properties>

        <parent>
<groupId>org.springframework.boot</groupId>
<artifactId>spring-boot-starter-parent</artifactId>
<version>1.5.1.RELEASE</version>
</parent>

<dependencies>
<!-- This is a web application -->
<!-- Adds Tomcat and Spring MVC, along others, jackson-databind included
transitively -->
<dependency>
<groupId>org.springframework.boot</groupId>
<artifactId>spring-boot-starter-web</artifactId>
</dependency>
<!-- Tomcat embedded container -->
<dependency>
<groupId>org.springframework.boot</groupId>
<artifactId>spring-boot-starter-tomcat</artifactId>
<scope>provided</scope>
</dependency>
<dependency>
<groupId>org.springframework.boot</groupId>
<artifactId>spring-boot-starter-test</artifactId>
<scope>test</scope>
</dependency>
<dependency>
<groupId>org.springframework.boot</groupId>
<artifactId>spring-boot-starter-data-jpa</artifactId>
</dependency>

<!-- https://mvnrepository.com/artifact/org.springframework.boot/spring-boot-starter-json -->
<dependency>
<groupId>org.springframework.boot</groupId>
<artifactId>spring-boot-starter-json</artifactId>
<version>2.0.3.RELEASE</version>

</dependency>
</dependencies>
<build>
<plugins>
<!-- Package as an executable jar/war -->
<plugin>
<groupId>org.springframework.boot</groupId>
<artifactId>spring-boot-maven-plugin</artifactId>
</plugin>
</plugins>
</build>

</project>

[2] - SpringBootWebApplication .java:


import org.springframework.boot.SpringApplication;

import org.springframework.boot.autoconfigure.SpringBootApplication;

//Create an Application class
@SpringBootApplication(scanBasePackages={"com.ishaan.springboot"})
// same as @Configuration @EnableAutoConfiguration @ComponentScan
public class SpringBootWebApplication {

public static void main(String[] args) {
SpringApplication.run(SpringBootWebApplication.class, args);
System.out.println("Hello Spring Boot !!");
}
}

// @SpringBootApplication  add
// @Configuration -tags the class as a source of bean definitions for the application context.

// @EnableAutoConfiguration tells Spring Boot to start adding beans based on classpath settings, //other beans, and various property settings.

[3] - WebServiceRestController .java:

import org.springframework.web.bind.annotation.RestController;
import org.springframework.web.bind.annotation.RequestMapping;
import org.springframework.web.bind.annotation.RequestMethod;

//Create a simple web application
@RestController
@RequestMapping("/api")
public class WebServiceRestController {

@RequestMapping(value = "/ping/", method = RequestMethod.GET)
public String ping() {
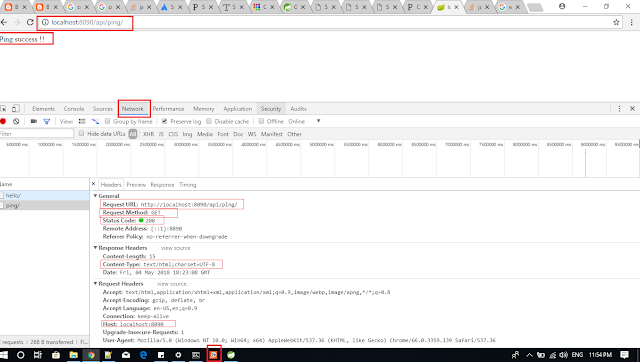
return "Ping success !!";
}
}

[4] - application.properties : (under src/main/resources)
# port number used for spring boot
server.port = 8090

[5] - application.yml: (under src/main/resources)                                        

        server:
            port: 8090
Note: Point [4] and point [5] are same thing, with different way of representation.

URL request to access resources: http://localhost:8090/api/ping/
Response from the TOMCAT server USING POSTMAN: Ping success !!


How to run standalone mock server on local laptop

 Please download the standalone wiremock server from Direct download section at the bottom of the page.  Download and installation Feel fre...